
【UE5】BlsquiSDK-Unrealの導入・セットアップ手順|手数料0%のゲーム内決済&Web3ウォレット連携
Unreal Engine 5(UE5)製のPCゲームにブロックチェーンアイテムやeスポーツ賞金配布、ゲーム内決済を組み込む際、複雑な暗号処理やプレイヤーに手間を強いるブラウザ拡張機能はもう必要ありません。
本記事では、公式リポジトリ BlsquiSDK-Unreal(https://github.com/blsqui/BlsquiSDK-Unreal) をUE5プロジェクトにインポートし、初期セットアップを行う手順をわかりやすく解説します。
まず最初にUnreal Engine プロジェクトを開きます。
Mac: /Users/<your account>/Documents/Unreal Projects/<Your UE5 Project>
Windows: C:\Users\<your account>\Documents\Unreal Projects\<Your Project UE5>
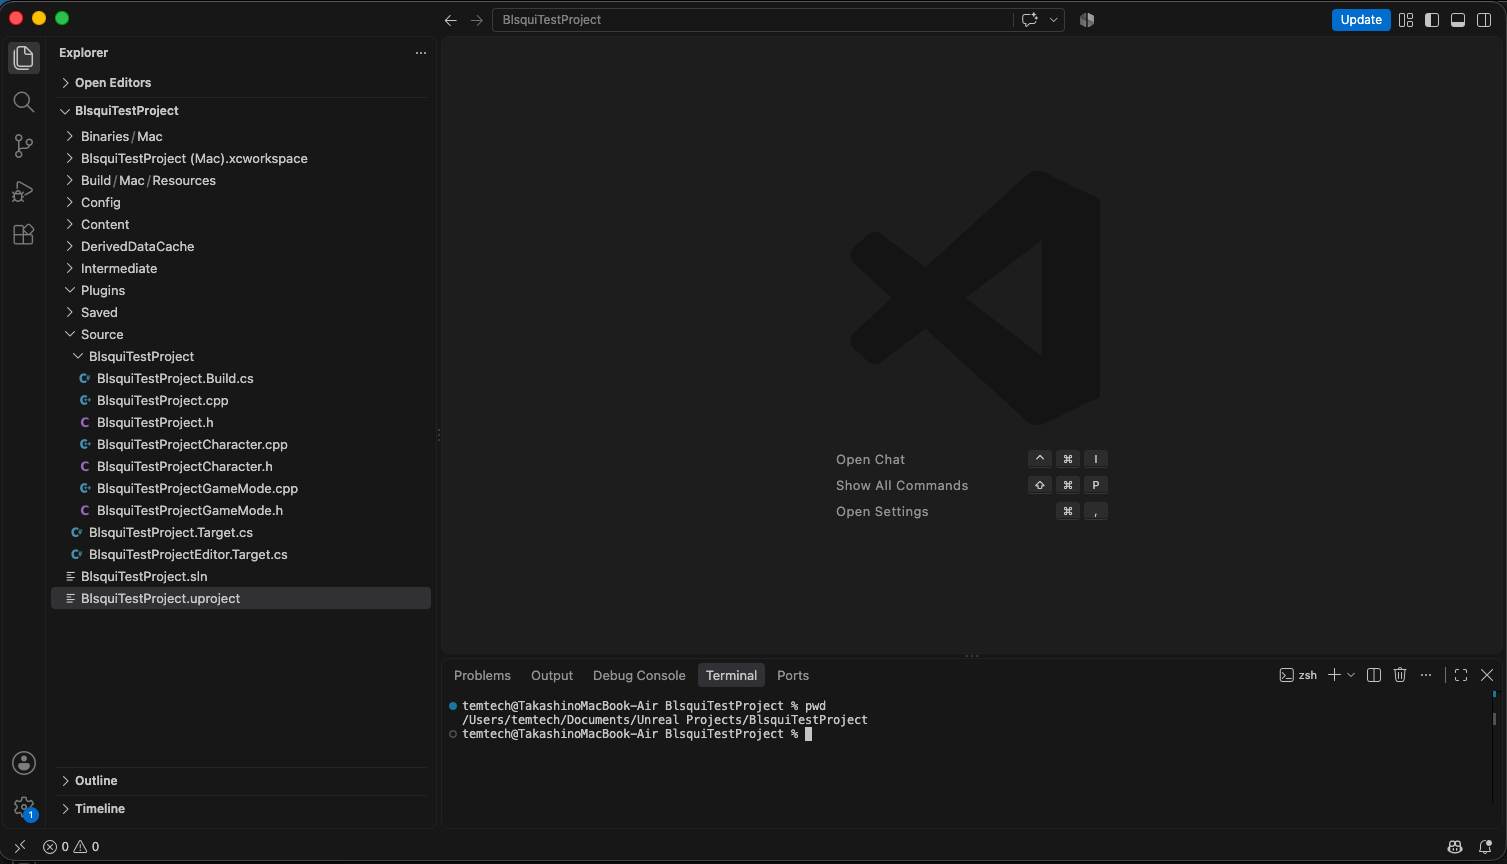
プロジェクトルートで以下のコマンドを実行します。
git clone https://github.com/blsqui/BlsquiSDK-Unreal.git Plugins/BlsquiSDK
Plugins フォルダにBlsquiSDKディレクトリが生成されます。
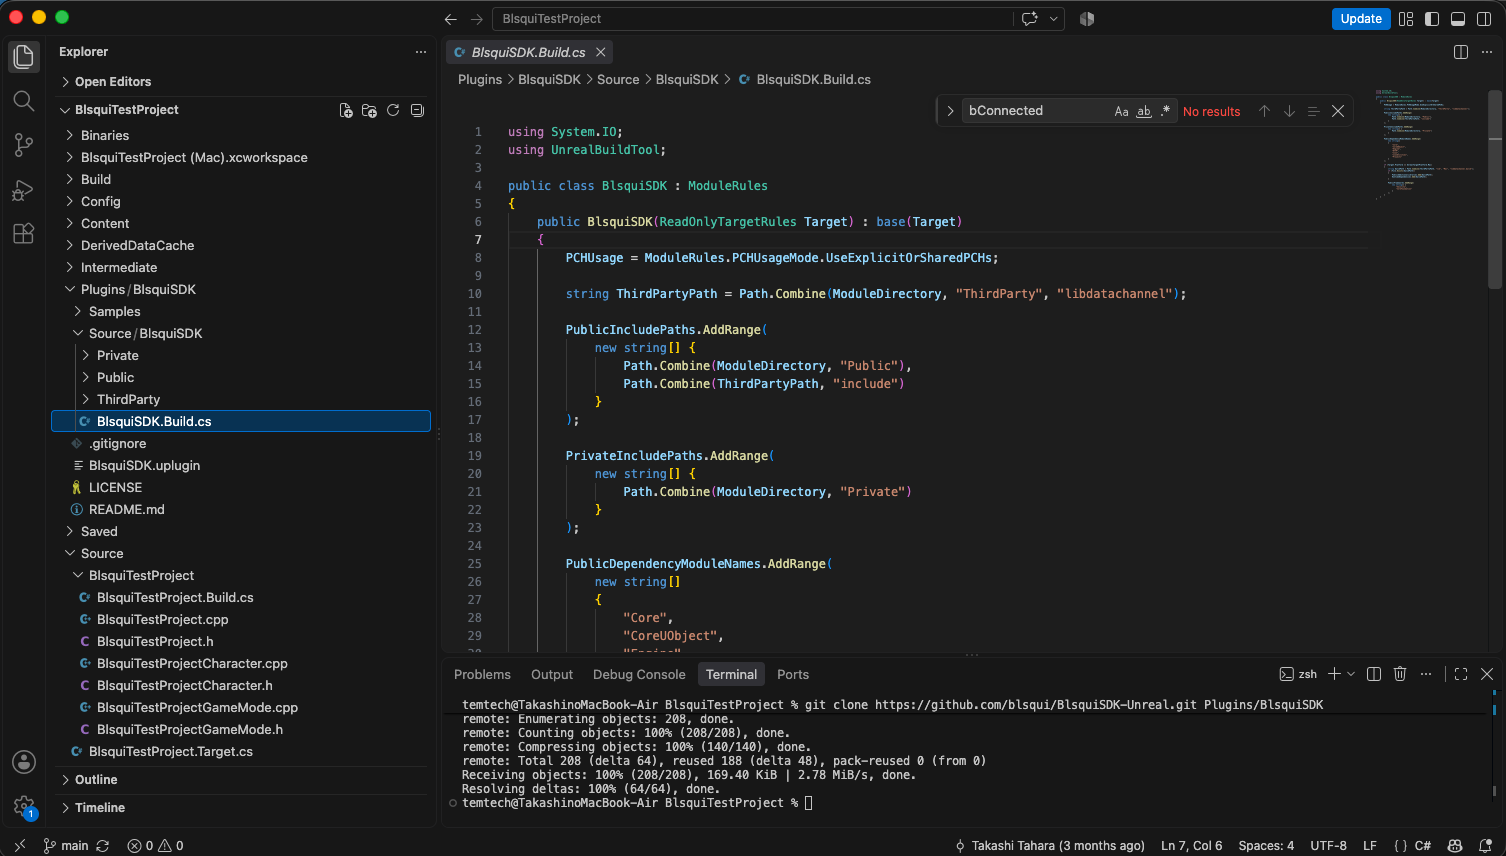
次にビルドします。
Mac:
"/Users/Shared/Epic Games/UE_5.5/Engine/Build/BatchFiles/Mac/Build.sh" \
  BlsquiTestProjectEditor Mac Development \
  -Project="/Users/<your account>/Documents/Unreal Projects/<Your UE5 Project>/<Your UE5 Project>.uproject"
Windows はあまりよく分からないですが以下のようにするようです。
"C:\Program Files\Epic Games\UE_5.5\Engine\Build\BatchFiles\Build.bat" ^
  BlsquiTestProjectEditor Win64 Development ^
  -Project="C:\Users\<your account>\Documents\Unreal Projects\<Your UE5 Project>\<Your UE5 Project>.uproject"
コマンドを実行して以下のように出力されればビルドは成功しています。
---- Starting trace ----
UbaSessionServer - Disable remote execution (remote sessions will finish current processes)
------ Building 12 action(s) started ------
[1/12] Compile [Apple] BlsquiSDKModule.cpp
[2/12] Compile [Apple] BlsquiCurrentUser.cpp
[3/12] Compile [Apple] BlsquiTestProjectGameMode.cpp
[4/12] Compile [Apple] BlsquiTestProjectCharacter.gen.cpp
[5/12] Compile [Apple] BlsquiSDKComponent.cpp
[6/12] Compile [Apple] BlsquiTestProjectCharacter.cpp
[7/12] Compile [Apple] Module.BlsquiSDK.cpp
[8/12] Compile [Apple] BlsquiStageSlot.cpp
[9/12] Compile [Apple] BlsquiWebRTCPresence.cpp
[10/12] Link [Apple] UnrealEditor-BlsquiSDK.dylib (UBA disabled)
ld: warning: building for macOS-13.0, but linking with dylib '@rpath/libdatachannel.0.dylib' which was built for newer version 26.0
[11/12] Link [Apple] UnrealEditor-BlsquiTestProject.dylib (UBA disabled)
ld: warning: building for macOS-13.0, but linking with dylib '@rpath/libdatachannel.0.dylib' which was built for newer version 26.0
[12/12] WriteMetadata BlsquiTestProjectEditor.target (UBA disabled)
Trace file written to /Users/temtech/Documents/Library/Application Support/Epic/UnrealBuildTool/Log.uba with size 4.1kb
Total time in Unreal Build Accelerator local executor: 15.74 seconds
Deploying BlsquiTestProjectEditor Mac Development...
Deploying now!
Total execution time: 20.81 seconds
ここでSDKのコードの中身について紹介します。
UE5開発者が普段通りのBlueprintやC++の感覚で組み込めるよう、SDKは以下の6つのモジュールに分けて設計しています。
BlsquiCurrentUser(セッション&インベントリ管理)UGameInstanceSubsystemを継承しているため、レベル遷移を跨いでもプレイヤーのログイン状態やウォレットアドレスが維持されます。ダッシュボードの起動(OpenDashboard)や、ゲーム側からのアイテム使用トリガー(RequestUseItem)、さらには外部Webダッシュボードからの装備変更・アイテム使用イベントの受信までを一手に担います。BlsquiSDKComponent(トランザクション実行&ステータス監視) PlayerControllerやキャラクターにアタッチできるUActorComponentです。RequestTransactionを呼ぶだけで、改ざん防止用の署名付きセッショントークンの発行からブラウザゲートウェイの起動、ブロック確定(SEALED)までの非同期ポーリングを自動で行い、完了時にデリゲート(OnTransactionCompleted)で通知します。BlsquiWebRTCPresence(ゼロラグP2P通信ブリッジ) ゲームクライアントとWebウォレット(ダッシュボード)をWebRTC DataChannel(libdatachannel)で直接つなぐ通信エンジンです。Webダッシュボード側で武器スロットを付け替えたりアイテム使用ボタンを押したりした瞬間に、ミリ秒単位の低遅延でゲーム画面へリアルタイム同期されます。BlsquiStageSlot&BlsquiTypes(Blueprintフレンドリーなデータ構造) 装備スロットの状態(FStageSlotItem)やアイテム使用リクエスト(FItemUseRequestPayload)、トランザクション結果(FTxResult)などをUSTRUCT(BlueprintType)として定義しています。C++を書かなくても、Blueprintのノード上でピンを繋ぐだけでそのままUI(UMG)やゲームロジックへ値を渡せます。BlsquiSDKModule(プラットフォーム別ネイティブライブラリ制御) プラグイン起動時にOS環境(Windows / macOS)を判別し、libdatachannelなどのサードパーティ製ネイティブバイナリを安全にロード・解放するモジュール初期化クラスです。
次にプロジェクトにBlsquiSDKを組み込んでいきます。
`Source/<Your UE5 Project>/<Your UE5 Project>.Build.cs`を開きます。
// Copyright Epic Games, Inc. All Rights Reserved.

using UnrealBuildTool;

public class BlsquiTestProject : ModuleRules
{
	public BlsquiTestProject(ReadOnlyTargetRules Target) : base(Target)
	{
		PCHUsage = PCHUsageMode.UseExplicitOrSharedPCHs;

		PublicDependencyModuleNames.AddRange(new string[] {
			"Core", "CoreUObject", "Engine", "InputCore", "EnhancedInput", "BlsquiSDK"
		});
	}
}
このように PublicDependencyModuleNames.AddRange に "BlsquiSDK" を追加します。
この状態で一度あなたのUE5プロジェクトを起動してみます。
まずプロジェクトをビルドします。
"/Users/Shared/Epic Games/UE_5.5/Engine/Build/BatchFiles/Mac/Build.sh" \
  <Your Project UE5>Editor Mac Development \
  -Project="/Users/<your account>/Documents/Unreal Projects/<Your Project UE5>/<Your Project UE5>.uproject"
WebRTCの設定
SDKはWebRTCに libdatachannel のライブラリを使用しています。
以下のコマンドを実行してください。
SRC_DYLIB="/Users/<your account>/Documents/Unreal Projects/<Your UE5 Project>/Plugins/BlsquiSDK/Source/BlsquiSDK/ThirdParty/libdatachannel/lib/Mac/libdatachannel.dylib"
PLUGIN_BIN="/Users/<your account>/Documents/Unreal Projects/<Your UE5 Project>/Plugins/BlsquiSDK/Binaries/Mac"
PROJECT_BIN="/Users/<your account>/Documents/Unreal Projects/<Your UE5 Project>/Binaries/Mac"

mkdir -p "$PLUGIN_BIN" "$PROJECT_BIN"
cp "$SRC_DYLIB" "$PLUGIN_BIN/libdatachannel.0.dylib"
cp "$SRC_DYLIB" "$PROJECT_BIN/libdatachannel.0.dylib"

install_name_tool -change "@rpath/libdatachannel.0.dylib" "@loader_path/libdatachannel.0.dylib" "$PLUGIN_BIN/UnrealEditor-BlsquiSDK.dylib"

codesign --force --sign - "$PLUGIN_BIN/libdatachannel.0.dylib"
codesign --force --sign - "$PROJECT_BIN/libdatachannel.0.dylib"
codesign --force --sign - "$PLUGIN_BIN/UnrealEditor-BlsquiSDK.dylib"
codesign --force --sign - "$PROJECT_BIN/UnrealEditor-<Your UE5 Project>.dylib"
UE5 Editorを起動します。
open "/Users/<your account>/Documents/Unreal Projects/<Your UE5 Project>/<Your UE5 Project>.uproject"
以下のようにUE5 Editorが立ち上がります。
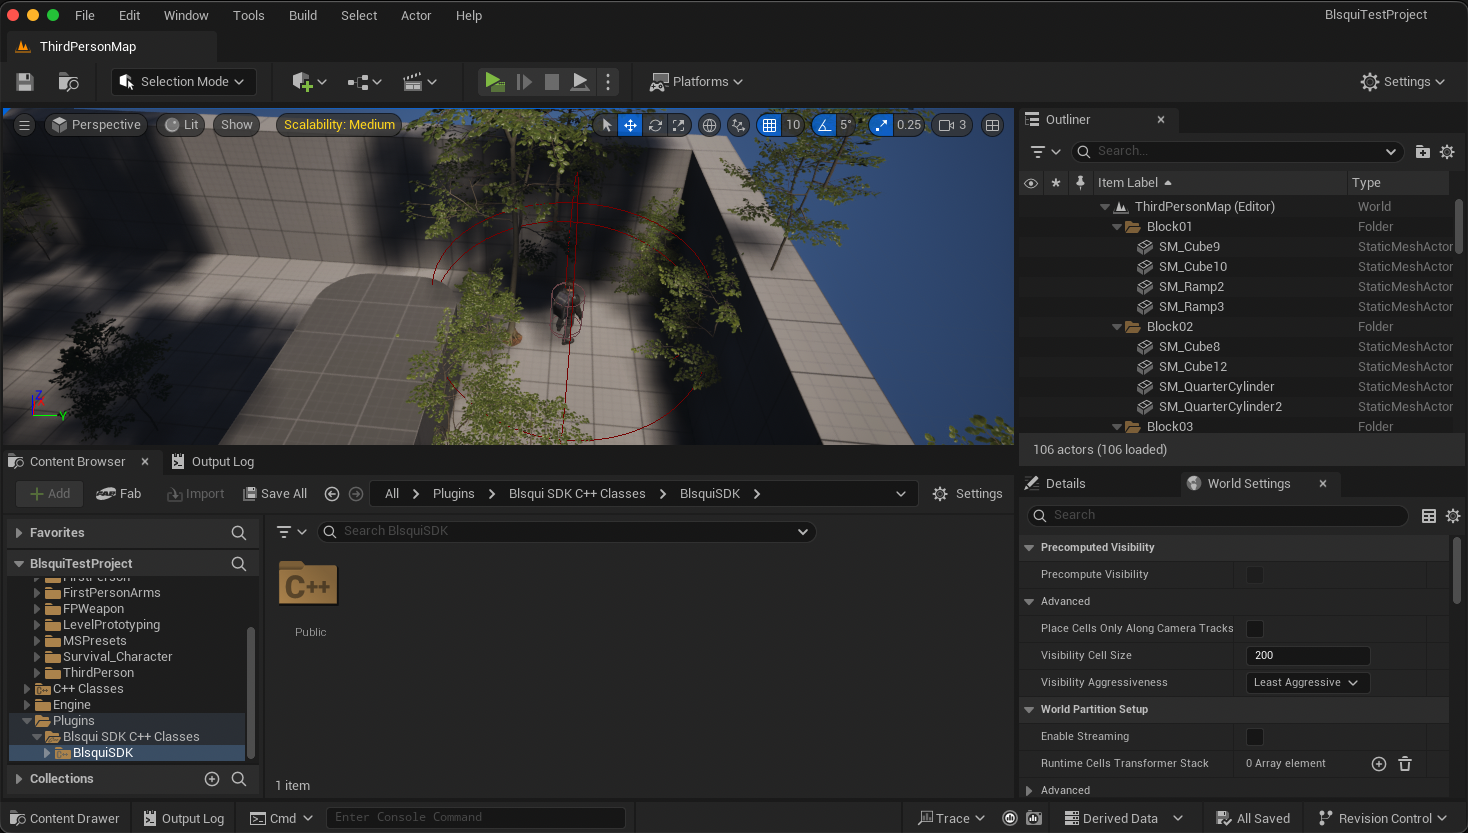
これは私のUE5プロジェクトの場合であって見える画面は全然違います。
特定のブロックチェーンアカウントの装備スロットの状態(FStageSlotItem)を取得する
エディターのGraphで以下のように設定します。
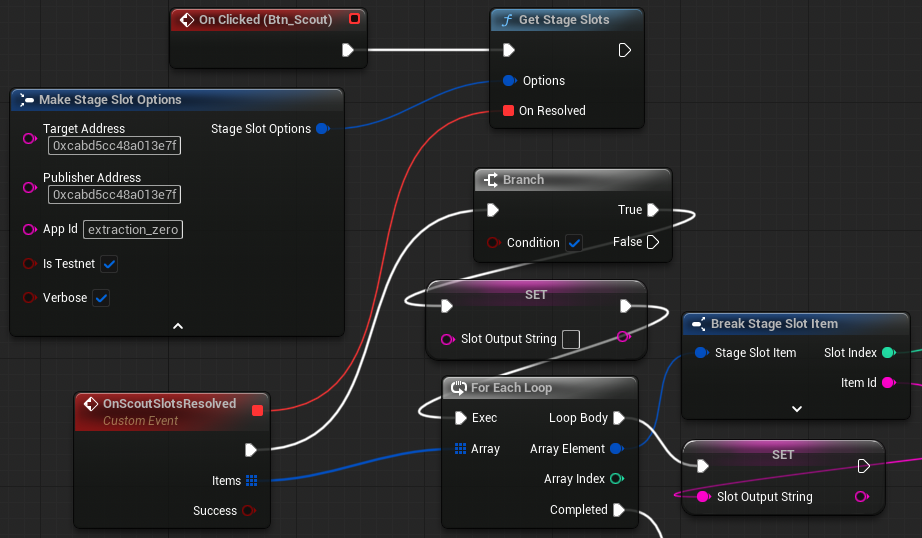
スロットはPublisherのアプリ別に設定されます。そのため特定のブロックチェーンアドレスに加えてPublisher のアドレス(Management Consoleでログインしたアドレス)とアプリIDをセットします。
ダッシュボードを開く。ダッシュボードに表示されるスロットの情報を取得する。
エディターのGraphで以下のように設定します。
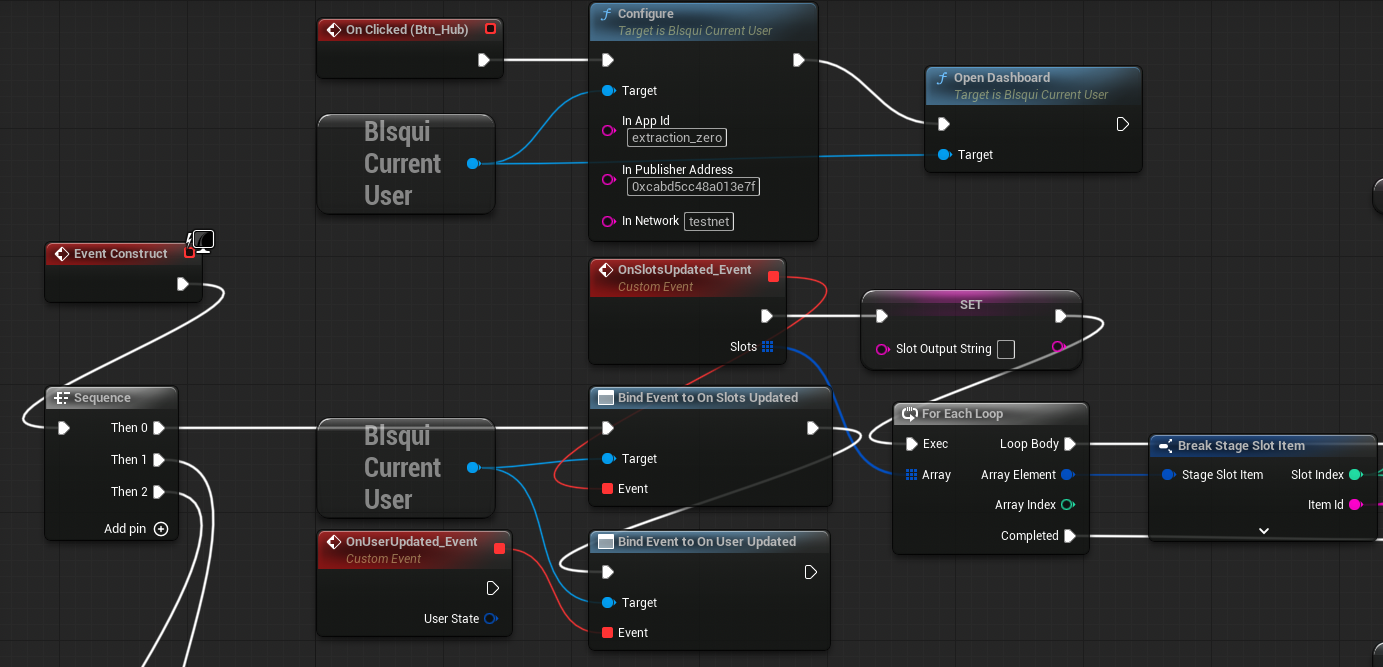
見にくいのは重々承知ですが、GeminiなどのAIにこの画像をアップロードするとどうすべきかを教えてくれます。(https://github.com/blsqui/BlsquiSDK-Unreal のURLと一緒にお願いします)
アイテム購入
エディターのGraphで以下のように設定します。
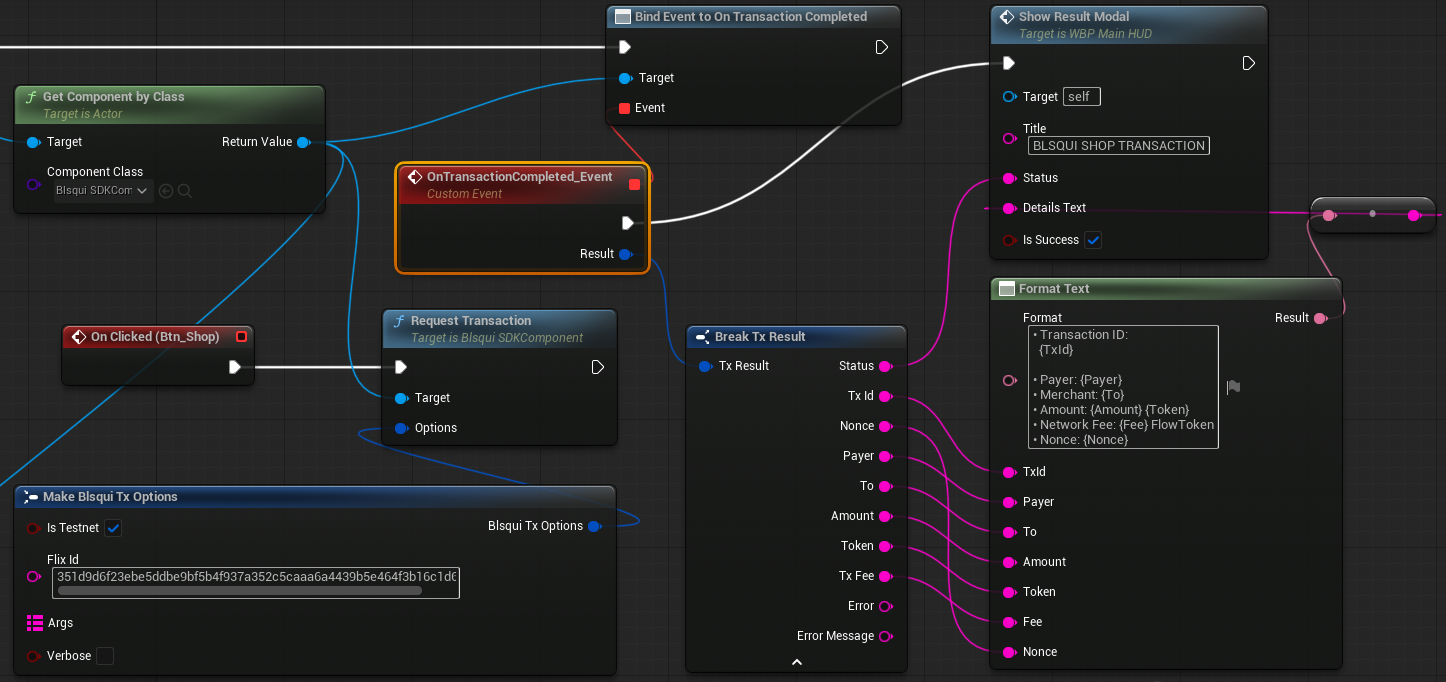
ブロックチェーンアイテムの使用を促す
エディターのGraphで以下のように設定します。
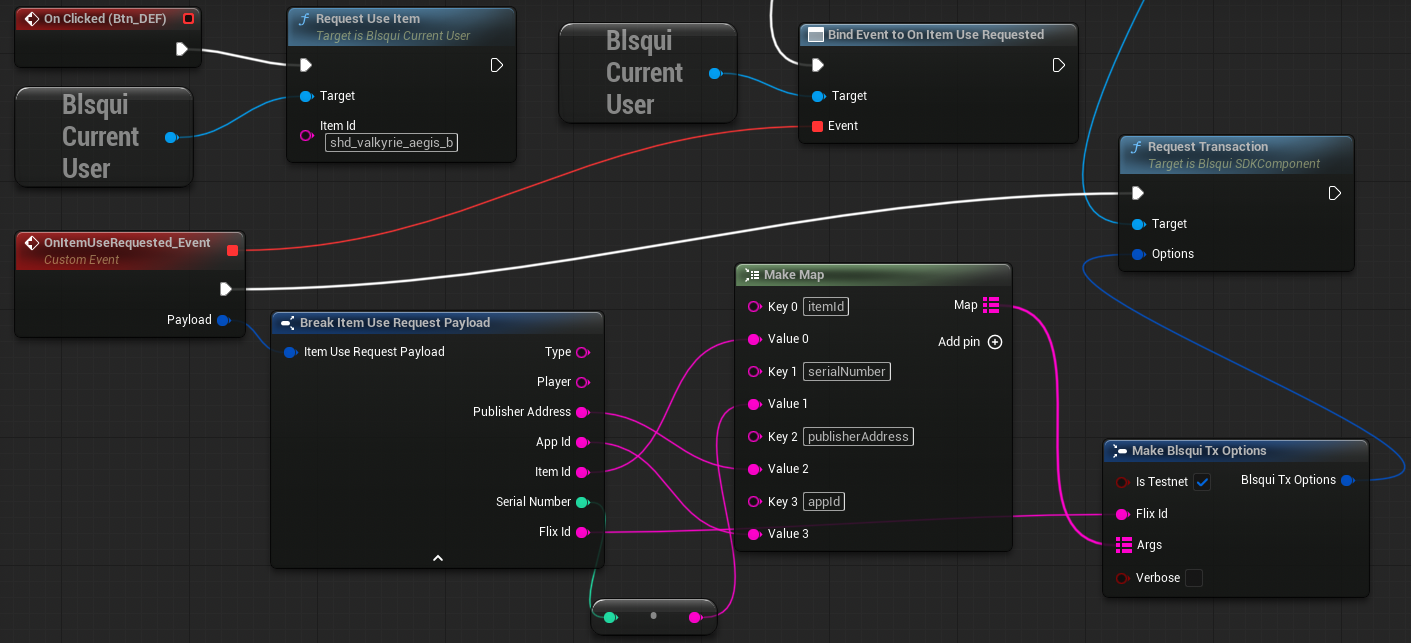
左上でボタン押下時にアイテムIDをセットした状態でダッシュボードにアイテム使用を促すメッセージを送っています。
それ以外はユーザーがダッシュボードでアイテム使用意思を表した時に実行する場所です。Publisher ID, App ID, Item ID, Serial Numberを渡すことで一意のアイテムの使用をRequestTransactionに送信しています。コールバックはアイテム使用のものと全く同じものが呼ばれます。(On Transaction Completed)
Try it out!
- モニターを2つ並べてゲームからダッシュボードを呼び出します。
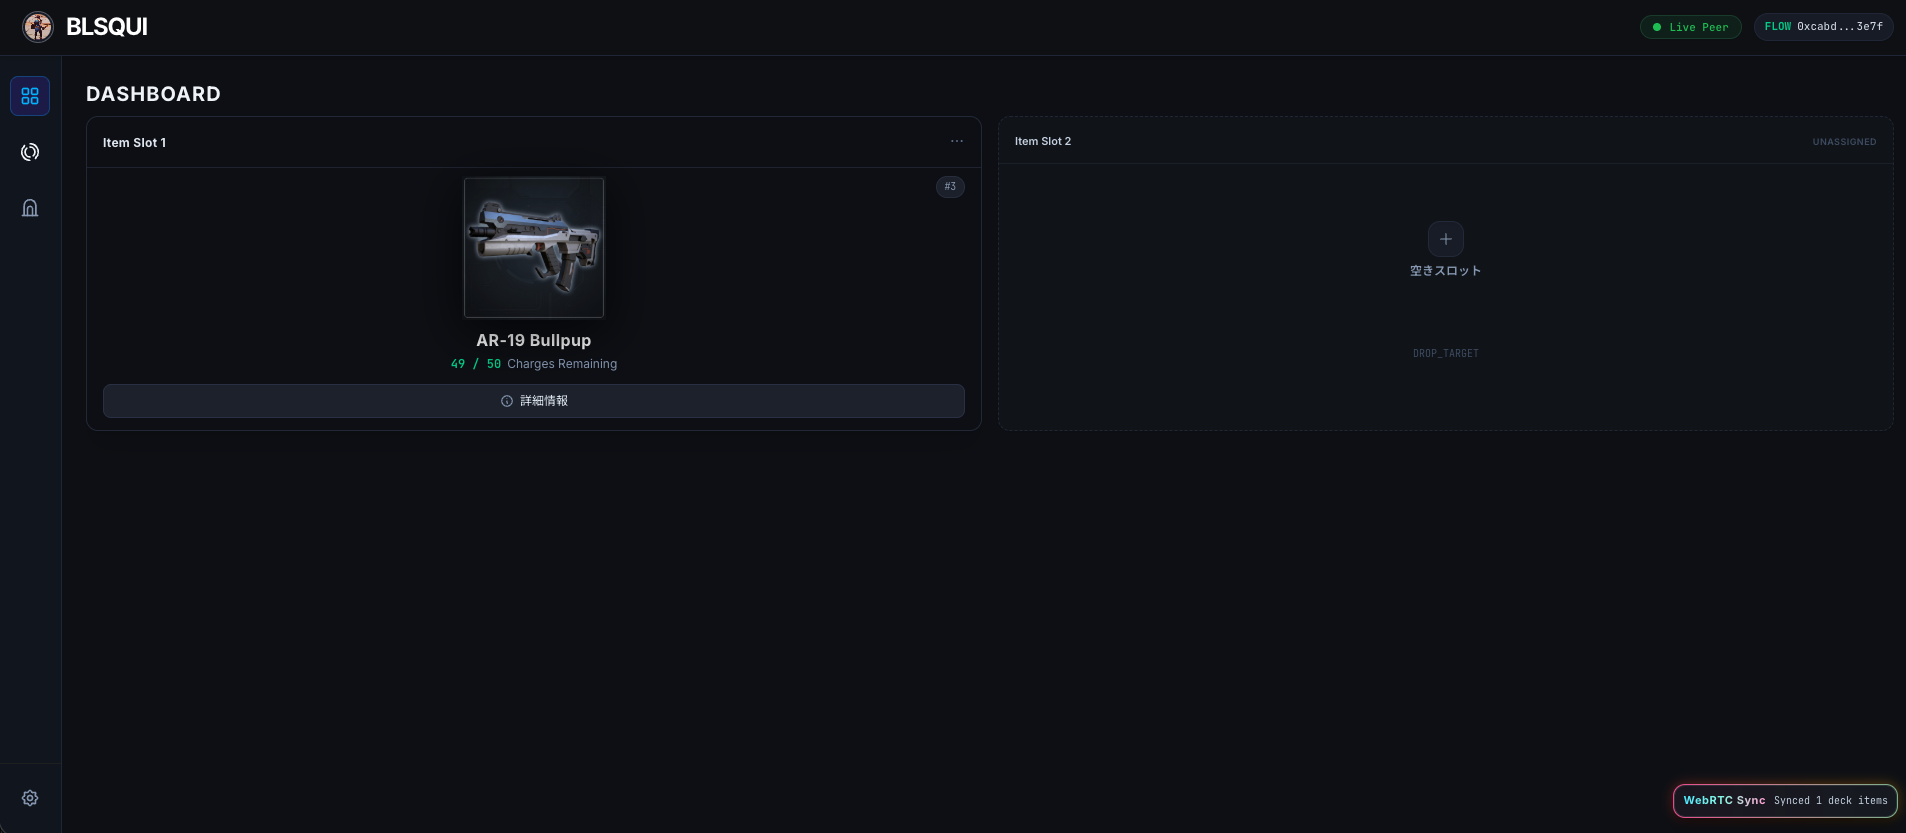
- アイテムを使用して欲しい時にアイテムの使用を促します。
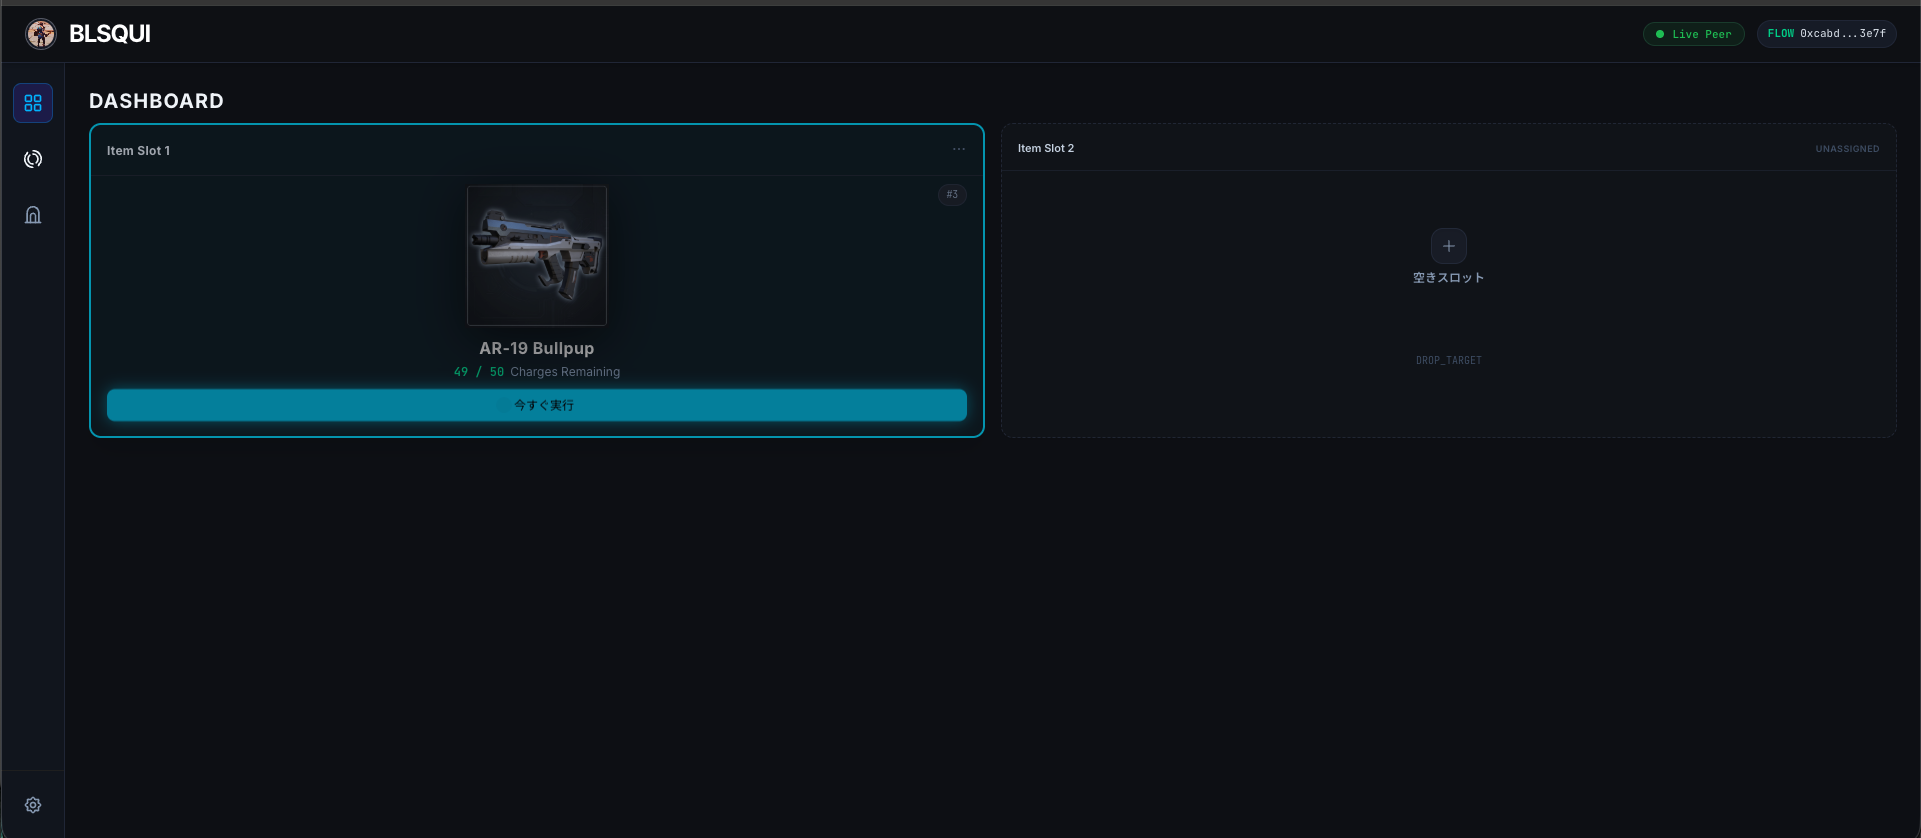
事前にダッシュボードを開いていると、このように指定したアイテムが光ります。一定時間以内にボタンを押すとゲームに通知されます。
- アイテム使用のトランザクションが実行されます。
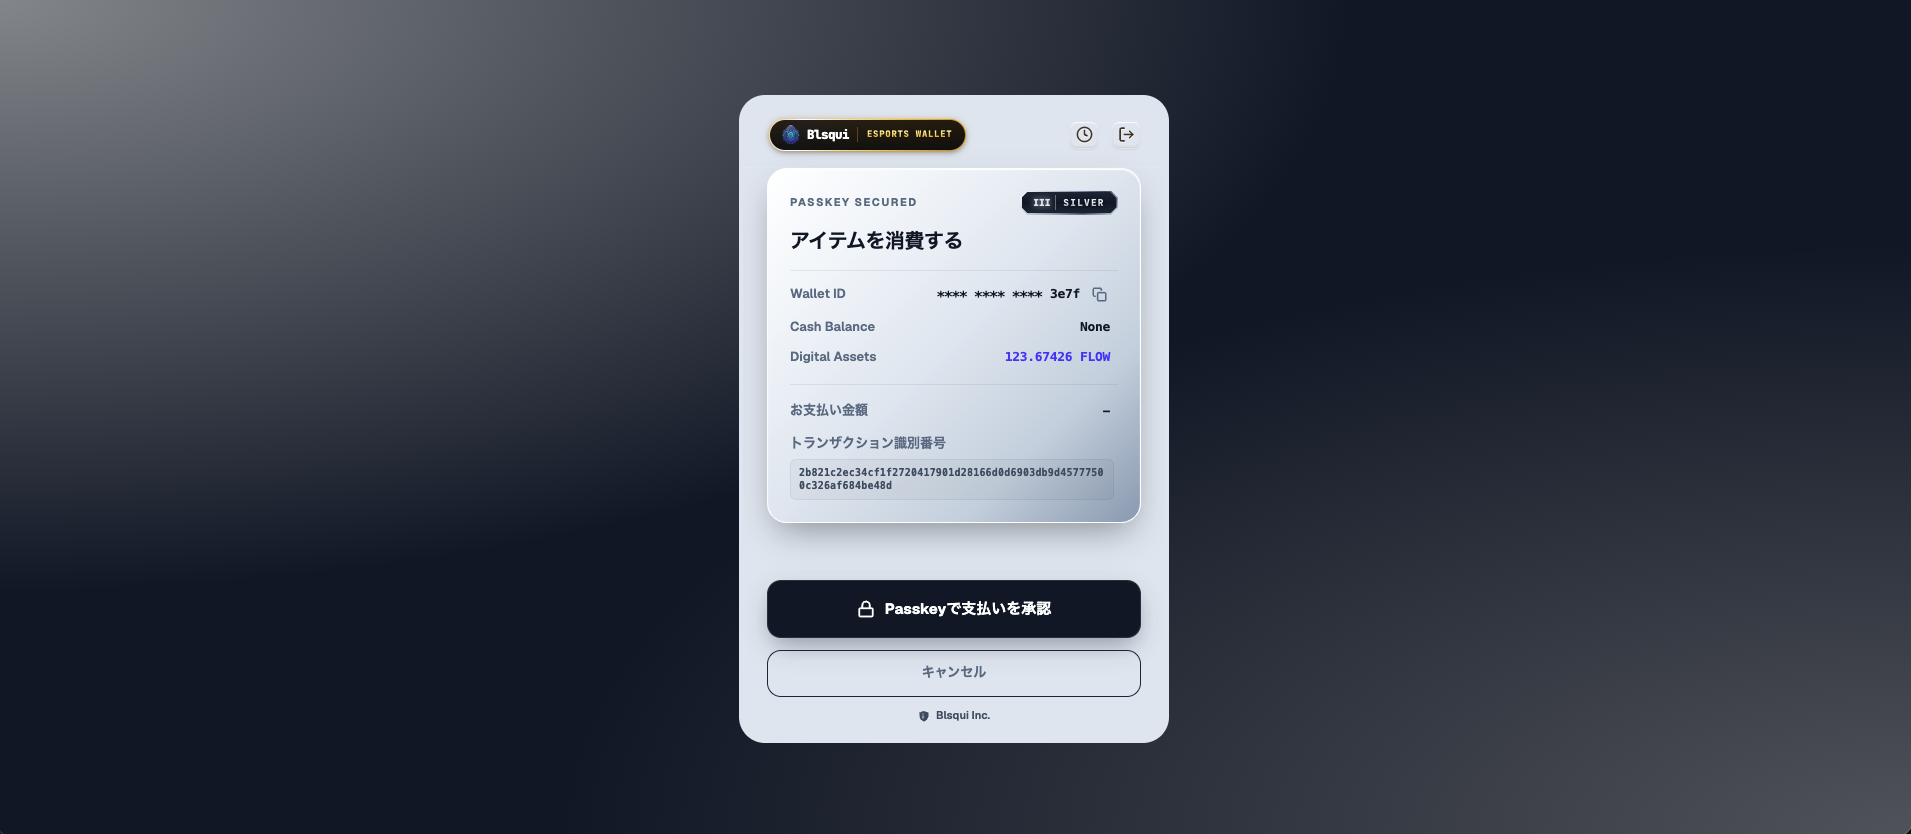
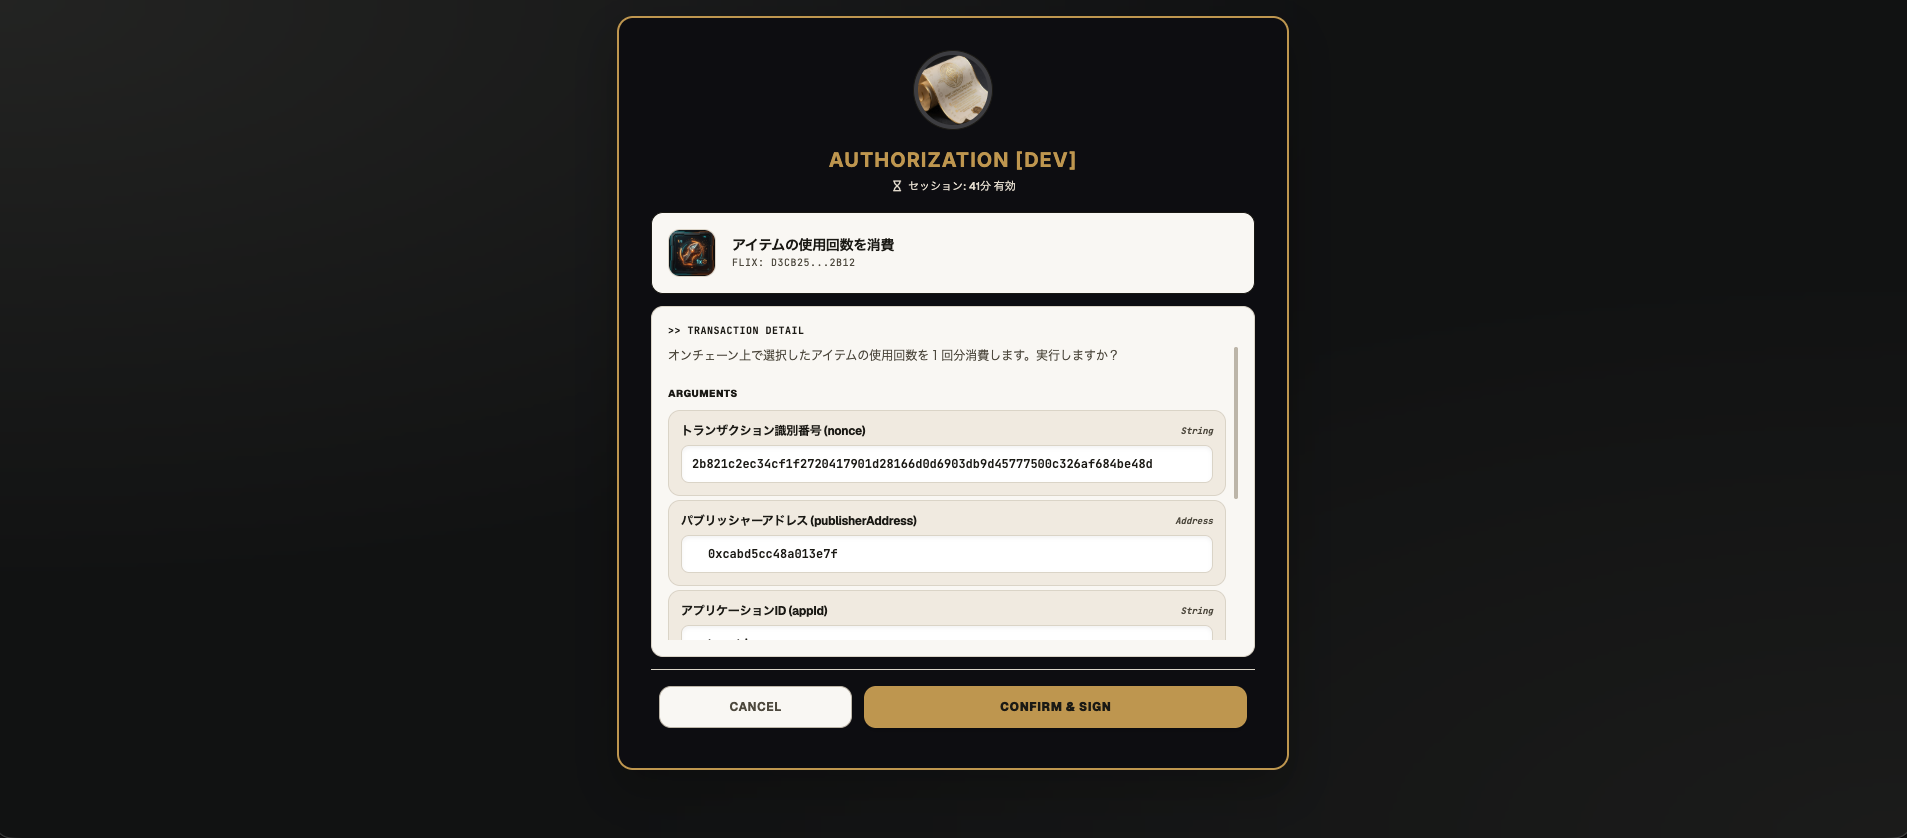
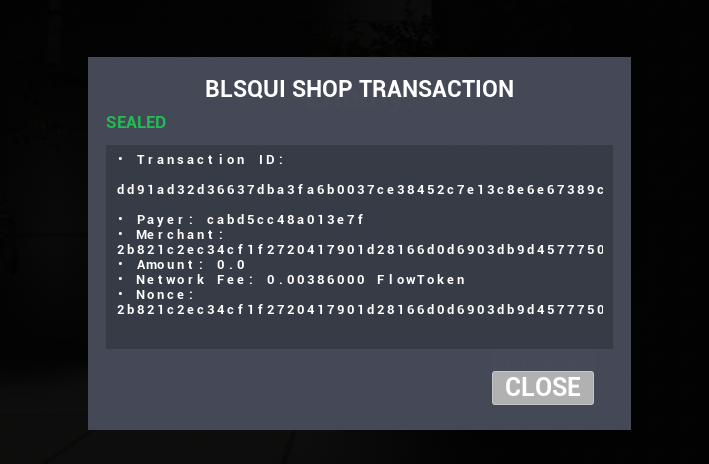
- ゲーム側でトランザクション結果を受け取ります。
About the author
- Founder & Architect of Blsqui. Building the cloud-native infrastructure layer that transforms standard video games into instant Web3 eSports platforms. Passionate about democratizing global revenue networks for the next generation of independent, AI-driven creators. Creating plug-and-play, no-code backend frameworks for Unity and Godot that integrate frictionless stablecoin microtransactions without client-side execution overhead.
Comments
Join the discussionNo comments yet. Be the first to comment.