Godot Engine での Web3 ゲーム実装ガイド|手数料0%のゲーム内決済&Web3ウォレット連携
Godot製のゲームにブロックチェーンアイテムやeスポーツ賞金配布、ゲーム内決済を組み込む際、複雑な暗号処理やプレイヤーに手間を強いるブラウザ拡張機能はもう必要ありません。 本記事では、公式リポジトリ BlsquiSDK-Godot(https://github.com/blsqui/BlsquiSDK-Godot )をGodotプロジェクトにインポートし、初期セットアップからWebRTCによるリアルタイム連携までを行う手順をわかりやすく解説します。
ターミナルを開いて、Godotプロジェクトのルートディレクトリで以下のコマンドを実行します。
git clone https://github.com/blsqui/BlsquiSDK-Godot.git addons/blsqui
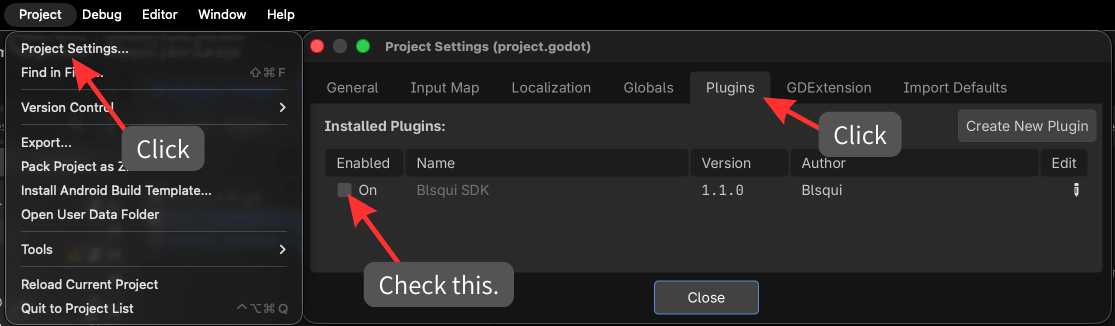
Godotエディターでプロジェクトを開きます。以下の手順を参考にしてSDKを有効化します。
WebRTC の設定
Godot 4 では、標準で WebRTC が組み込まれているのは Web(HTML5)エクスポートのみです。そのため、macOS・Windows・Linux・iOS・Android などのネイティブビルドや Godot エディタ上で WebRTCPeerConnection および WebRTCDataChannel を動作させるには、公式の WebRTC Native GDExtension(webrtc-native) を導入する必要があります。
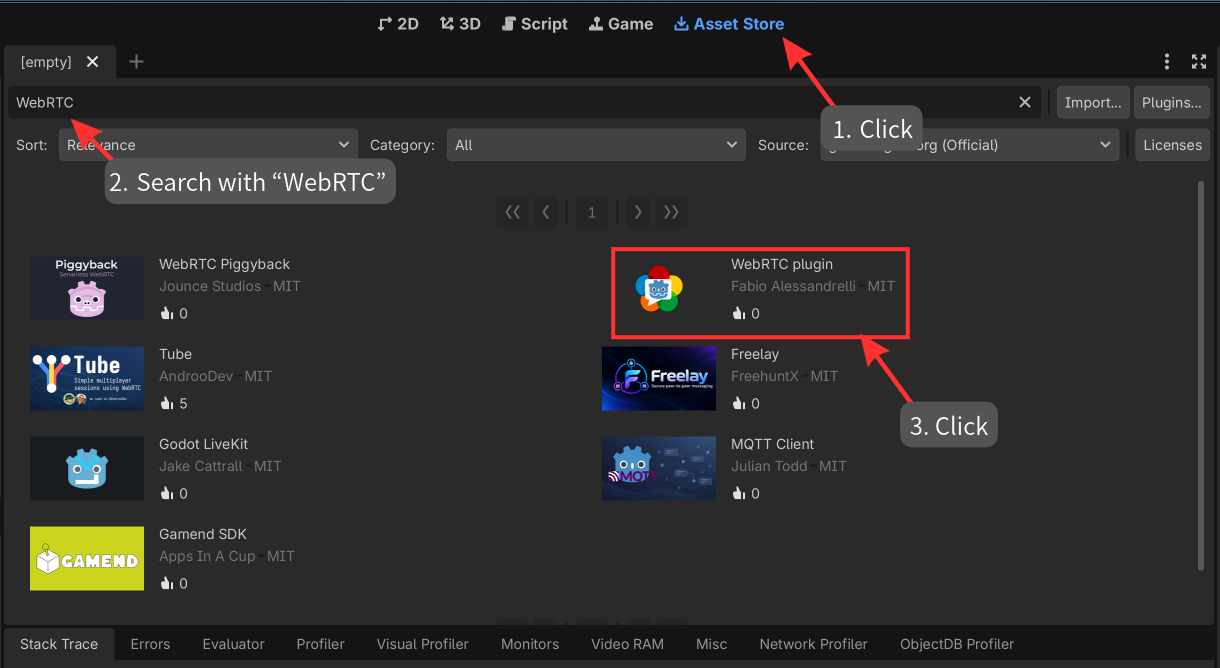
インストール手順(Asset Store / AssetLib):
- Godot エディタ上部の Asset Store(AssetLib) タブを開き、
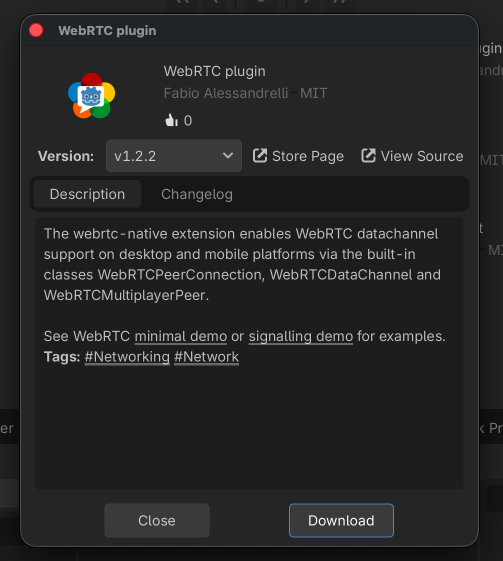
WebRTCで検索します。 - WebRTC plugin(作成者: Fabio Alessandrelli)を選択し、Download → Install をクリックして
res://addons/webrtc_native/に展開します。 - Project → Reload Current Project でプロジェクトを再読み込みすると、GDExtension が自動的に有効化されます。
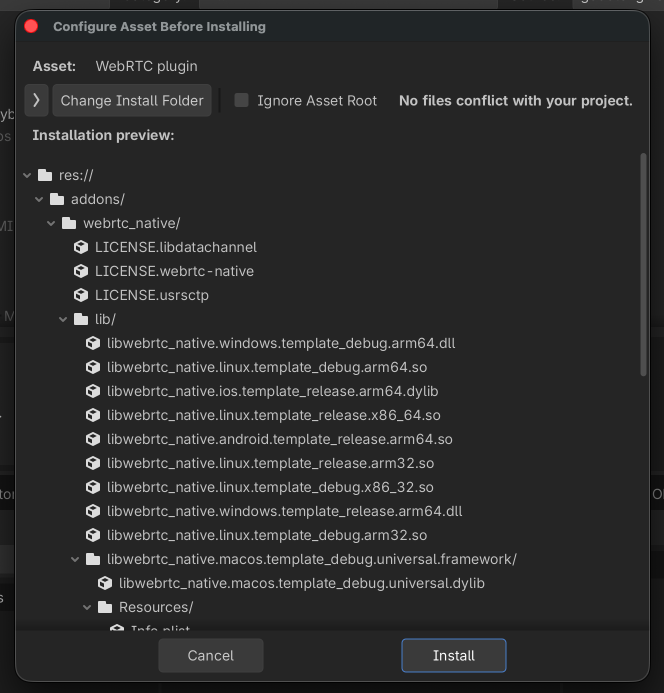
自動的にスクリプトがコンパイルされます。
ここで SDK のコードの中身について紹介します。 Godot 開発者がスマートコントラクトの難解な仕様や暗号署名の実装を意識することなく、普段通りの GDScript(await や signal購読)の感覚で組み込めるよう、SDK は以下の4つのスクリプトに分けて設計しています。
BlsquiSDK(blsqui_sdk.gd/ 静的エントリポイント&トランザクションエンジン) ゲーム側から直接呼び出す静的インターフェース(summon_dashboard、request_transaction、get_stage_slotsなど)を提供します。内部では暗号論的に安全な 256-bit のnonceを生成し、エッジ関数(/api/session/sign)から署名済み JWT セッショントークンを取得したうえでシステムブラウザを起動し、オンチェーンでトランザクションが確定(SEALED)するまで非同期でステータスをポーリングします。BlsquiCurrentUser(blsqui_current_user.gd/ セッション&インベントリ管理ノード)Nodeを継承してルートツリーに常駐し、プレイヤーのウォレットアドレス、ログイン状態、装備中のスロット情報(slot)を一元管理します。Web ダッシュボードとの連携用ルーム ID(channel_key)の生成や 10 秒ごとのハートビート送信を担い、ログイン・ログアウトやアイテム装備・使用リクエストを受信するとuser_updated・slots_updated・item_use_requestedの各signalを発火してゲーム UI やロジックへ即座に通知します。BlsquiStageSlot(blsqui_stage_slot.gd/ リアルタイム双方向 P2P 通信クライアント) WebRTC Native GDExtension を利用し、Pion シグナリングハブ経由でブラウザ上のウォレットダッシュボードと低遅延なWebRTCDataChannelを確立します。チャネル開通直後の自動同期リクエスト(ping_dashboard)や再接続チェック(verify_or_reconnect)を備え、ダッシュボード側でのアイテム装備変更や消費リクエスト(ITEM_USE_REQUESTED)をリアルタイムにゲームクライアントへ中継します。BlsquiStageSlot(blsqui_stage_slot.gd/ オンチェーン装備スロット直接照会モジュール) ウォレットのログインセッションを介さずに、Flow アクセスノードの REST API(/v1/scripts)へ Cadence スクリプトを直接送信する軽量ユーティリティです。指定したプレイヤーアドレス・パブリッシャーアドレス・アプリ ID に紐づく装備スロット配列をオンチェーンから直接取得し、ゲーム側で扱いやすい[{"slotIndex": 1, "itemId": "..."}, ...]形式にデコードして返却します。
次にプロジェクトにBlsquiSDKを組み込んでいきます。
特定のブロックチェーンアカウントの装備スロットの状態を取得する
BlsquiStageSlot.GetStageSlotsを呼び出します。
(コード例)
using System.Text;
using UnityEngine;
using TMPro;
using Blsqui.SDK;

public class ScoutButtonHandler : MonoBehaviour
{
    private const string TARGET_ADDRESS = "0x2f13c512df0b0ad7";
    private const string PUBLISHER_ADDRESS = "0x2f13c512df0b0ad7";
    private const string APP_ID = "valkyrie_vanguard";

    [Header("UI Dialog References")]
    [SerializeField] private GameObject tournamentDialog;
    [SerializeField] private TMP_Text titleText;
    [SerializeField] private TMP_Text messageText;
    [SerializeField] private GameObject cancelButton; // Will be hidden for Scout modal

    public async void ScoutOpponentSlots()
    {
        Debug.Log($"[Scout] Querying equipped slots for: {TARGET_ADDRESS}");

        // Show immediate loading feedback on the dialog
        if (tournamentDialog != null)
        {
            if (cancelButton != null) cancelButton.SetActive(false);
            if (titleText != null) titleText.text = "Scouting Opponent...";
            if (messageText != null) messageText.text = $"Connecting to Flow Access Node...\nTarget: {TARGET_ADDRESS}";
            tournamentDialog.SetActive(true);
        }

        // Fetch equipped slots from Flow Testnet
        var slots = await BlsquiStageSlot.GetStageSlots(new StageSlotOptions
        {
            targetAddress = TARGET_ADDRESS,
            publisherAddress = PUBLISHER_ADDRESS,
            appId = APP_ID,
            isTestnet = true,
            verbose = true
        });

        // Format and display the scouted results
        if (tournamentDialog != null && messageText != null)
        {
            if (titleText != null) titleText.text = "Opponent Loadout";

            int maxSlotsToShow = 3;
            var sb = new StringBuilder();
            sb.AppendLine($"Target: {TARGET_ADDRESS}");
            sb.AppendLine("Equipped Item Slots:\n");

            bool hasAnyEquipped = false;
            int count = 0;

            foreach (var slot in slots)
            {
                if (count >= maxSlotsToShow)
                {
                    break;
                }

                if (!string.IsNullOrWhiteSpace(slot.itemId))
                {
                    hasAnyEquipped = true;
                    sb.AppendLine($"• Slot {slot.slotIndex}: {slot.itemId}");
                }
                else
                {
                    sb.AppendLine($"• Slot {slot.slotIndex}: (Empty)");
                }

                count++;
            }

            if (!hasAnyEquipped)
            {
                sb.AppendLine("No items equipped in stage slots.");
            }

            messageText.text = sb.ToString();
        }
    }

    // Hooked to ConfirmButton.onClick to dismiss the modal
    public void OnCloseScoutDialog()
    {
        if (tournamentDialog != null)
        {
            tournamentDialog.SetActive(false);
        }
    }
}
このコードをあるボタンのクリックイベントとして結びつけます。
イベントを実行すると指定したアドレスのスロット情報を取得できます。
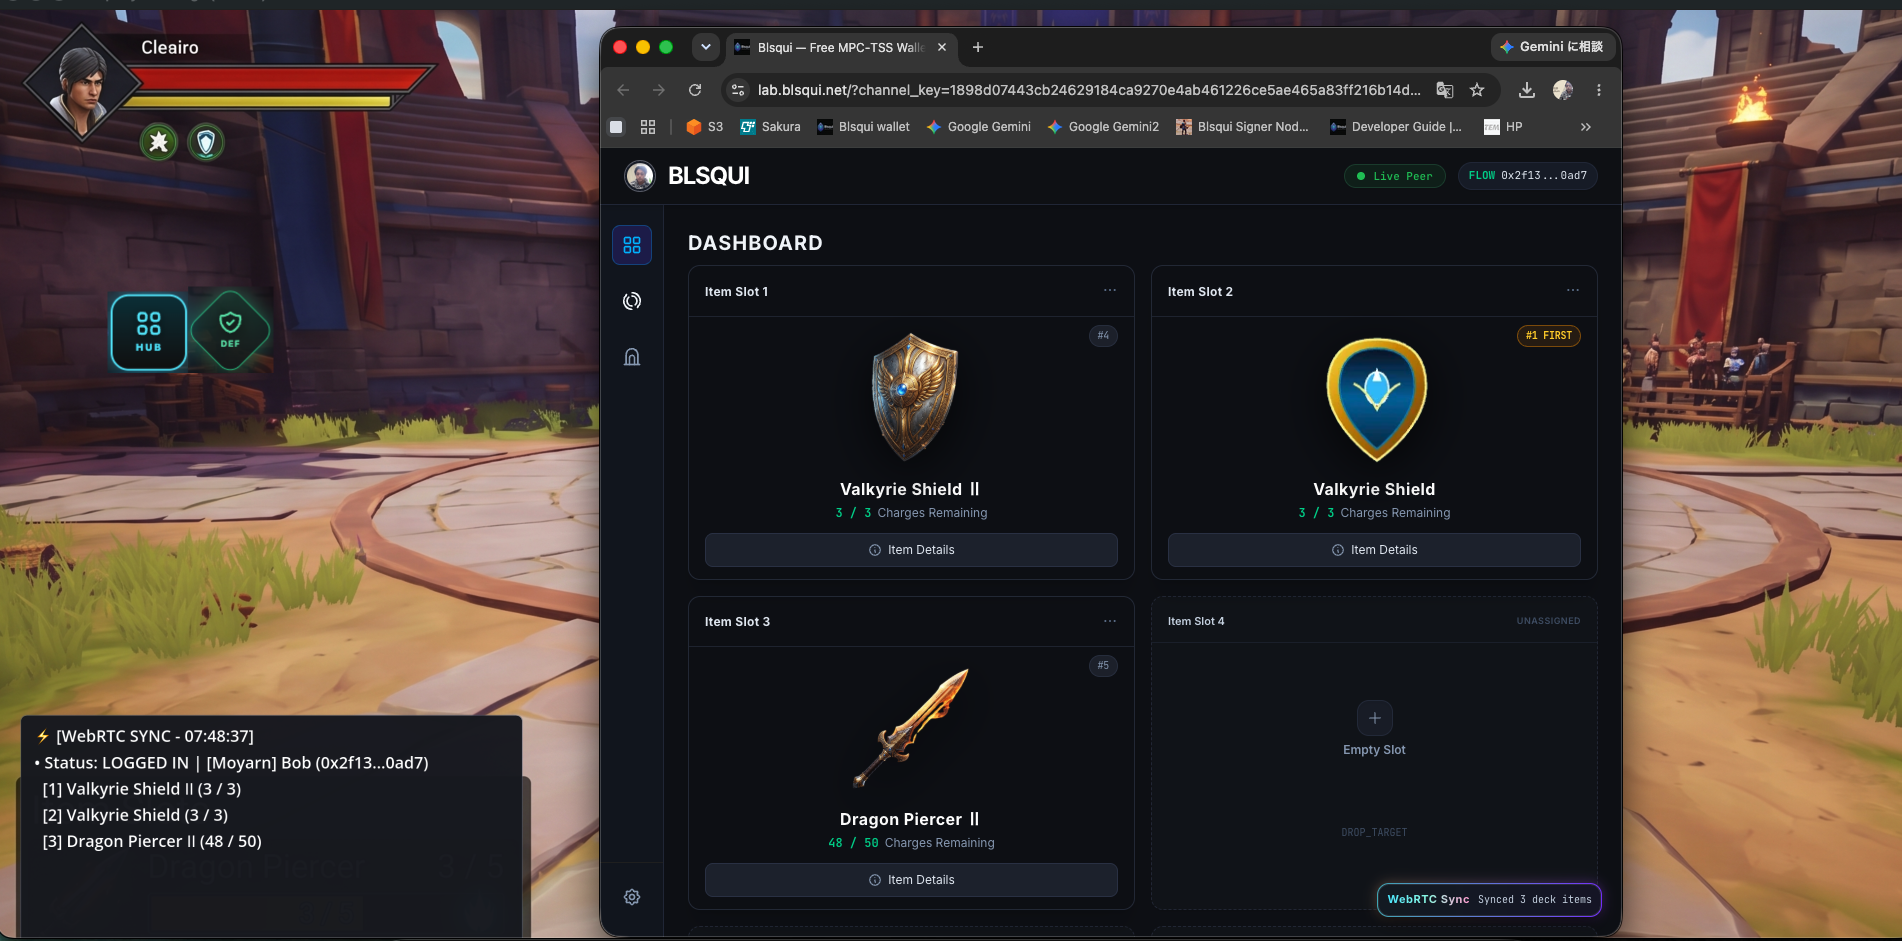
ダッシュボードを開く。ダッシュボードに表示されるスロットの情報を取得する。
BlsquiCurrentUser.Instance.OpenDashboardを呼び出します。
(コード例)
using System.Collections.Generic;
using UnityEngine;
using Blsqui.SDK;

public class HubButtonHandler : MonoBehaviour
{
    [Header("App Config")]
    [SerializeField] private string appId = "valkyrie_vanguard";
    [SerializeField] private string publisherAddress = "0x2f13c512df0b0ad7";
    [SerializeField] private string network = "testnet";

    private void Start()
    {
        // Ensure BlsquiCurrentUser manager exists in scene
        if (BlsquiCurrentUser.Instance == null)
        {
            var userGo = new GameObject("BlsquiCurrentUser");
            var user = userGo.AddComponent<BlsquiCurrentUser>();
            user.Configure(appId, publisherAddress, network);
        }
        else
        {
            BlsquiCurrentUser.Instance.Configure(appId, publisherAddress, network);
        }

        // Subscribe to real-time user profile & equipped slot updates from the dashboard
        BlsquiCurrentUser.Instance.OnUserUpdated += HandleUserUpdated;
        BlsquiCurrentUser.Instance.OnSlotsUpdated += HandleSlotsUpdated;
    }

    private void OnDestroy()
    {
        if (BlsquiCurrentUser.Instance != null)
        {
            BlsquiCurrentUser.Instance.OnUserUpdated -= HandleUserUpdated;
            BlsquiCurrentUser.Instance.OnSlotsUpdated -= HandleSlotsUpdated;
        }
    }

    public void OnHubClicked()
    {
        Debug.Log("[Hub] Opening Blsqui Dashboard...");
        BlsquiCurrentUser.Instance.OpenDashboard();
    }

    private void HandleUserUpdated(CurrentUserState user)
    {
        if (user.loggedIn)
        {
            Debug.Log($"[Hub] Dashboard Connected | Player: {user.addr} | Name: {user.userName}");
        }
        else
        {
            Debug.Log("[Hub] Player logged out from Dashboard.");
        }
    }

    private void HandleSlotsUpdated(List<StageSlotItem> slots)
    {
        Debug.Log($"[Hub] Synced {slots.Count} equipped slot(s) from Dashboard:");
        foreach (var slot in slots)
        {
            Debug.Log($"  - Slot {slot.slotIndex}: {slot.itemId}");
        }
    }
}
このコードをあるボタンのクリックイベントとして結びつけます。
イベントを実行するとWebダッシュノードが開き、ユーザーの情報と装備スロット情報がリアルタイムでGodotゲームエンジンに伝えられます。
アイテム購入
BlsquiSDK.request_transactionを呼び出します。
(コード例)
class_name ShopButtonHandler
extends Button

const WEAPON_SHOP_FLIX_ID: String = "351d9d6f23ebe5ddbe9bf5b4f937a352c5caaa6a4439b5e464f3b16c1d671472"

@onready var loading_dialog: AcceptDialog = get_node_or_null("../LoadingDialog")

var _is_purchasing: bool = false

func _ready() -> void:
	pressed.connect(_on_shop_button_clicked)

func _on_shop_button_clicked() -> void:
	if _is_purchasing:
		return

	_is_purchasing = true
	disabled = true
	print("[Shop] Opening purchase transaction...")

	# Show transaction feedback in the dialog (matching car_movement.gd)
	if loading_dialog != null:
		loading_dialog.title = "Processing Shop Item..."
		loading_dialog.dialog_text = "Authorizing transaction on Flow...\nPlease complete payment in the browser."
		loading_dialog.popup_centered()

	# Configure transaction options matching Unity ShopButtonHandler
	var options: Dictionary = {
		"is_testnet": true,
		"verbose": true,
		"flix_id": WEAPON_SHOP_FLIX_ID,
		"args": {}
	}

	var result: Dictionary = await BlsquiSDK.request_transaction(options)

	# Update dialog state upon completion
	if result.get("status") == "SEALED":
		var tx_id: String = str(result.get("txId", ""))
		print("Shop purchase succeeded! TX ID: ", tx_id)
		if loading_dialog != null:
			loading_dialog.title = "Purchase Successful!"
			loading_dialog.dialog_text = "Item purchase sealed !!!\n\nTX ID:\n%s" % tx_id
			loading_dialog.popup_centered()
	else:
		var err_msg: String = str(result.get("errorMessage", ""))
		if err_msg == "" or err_msg == "<null>":
			err_msg = str(result.get("error", "Unknown error"))
		push_warning("[Shop] Purchase incomplete. Status: %s | Error: %s" % [result.get("status", "UNKNOWN"), err_msg])
		if loading_dialog != null:
			loading_dialog.title = "Transaction Cancelled"
			loading_dialog.dialog_text = "Status: %s\n%s" % [result.get("status", "UNKNOWN"), err_msg]
			loading_dialog.popup_centered()

	disabled = false
	_is_purchasing = false
このコードをあるボタンのクリックイベントとして結びつけます。
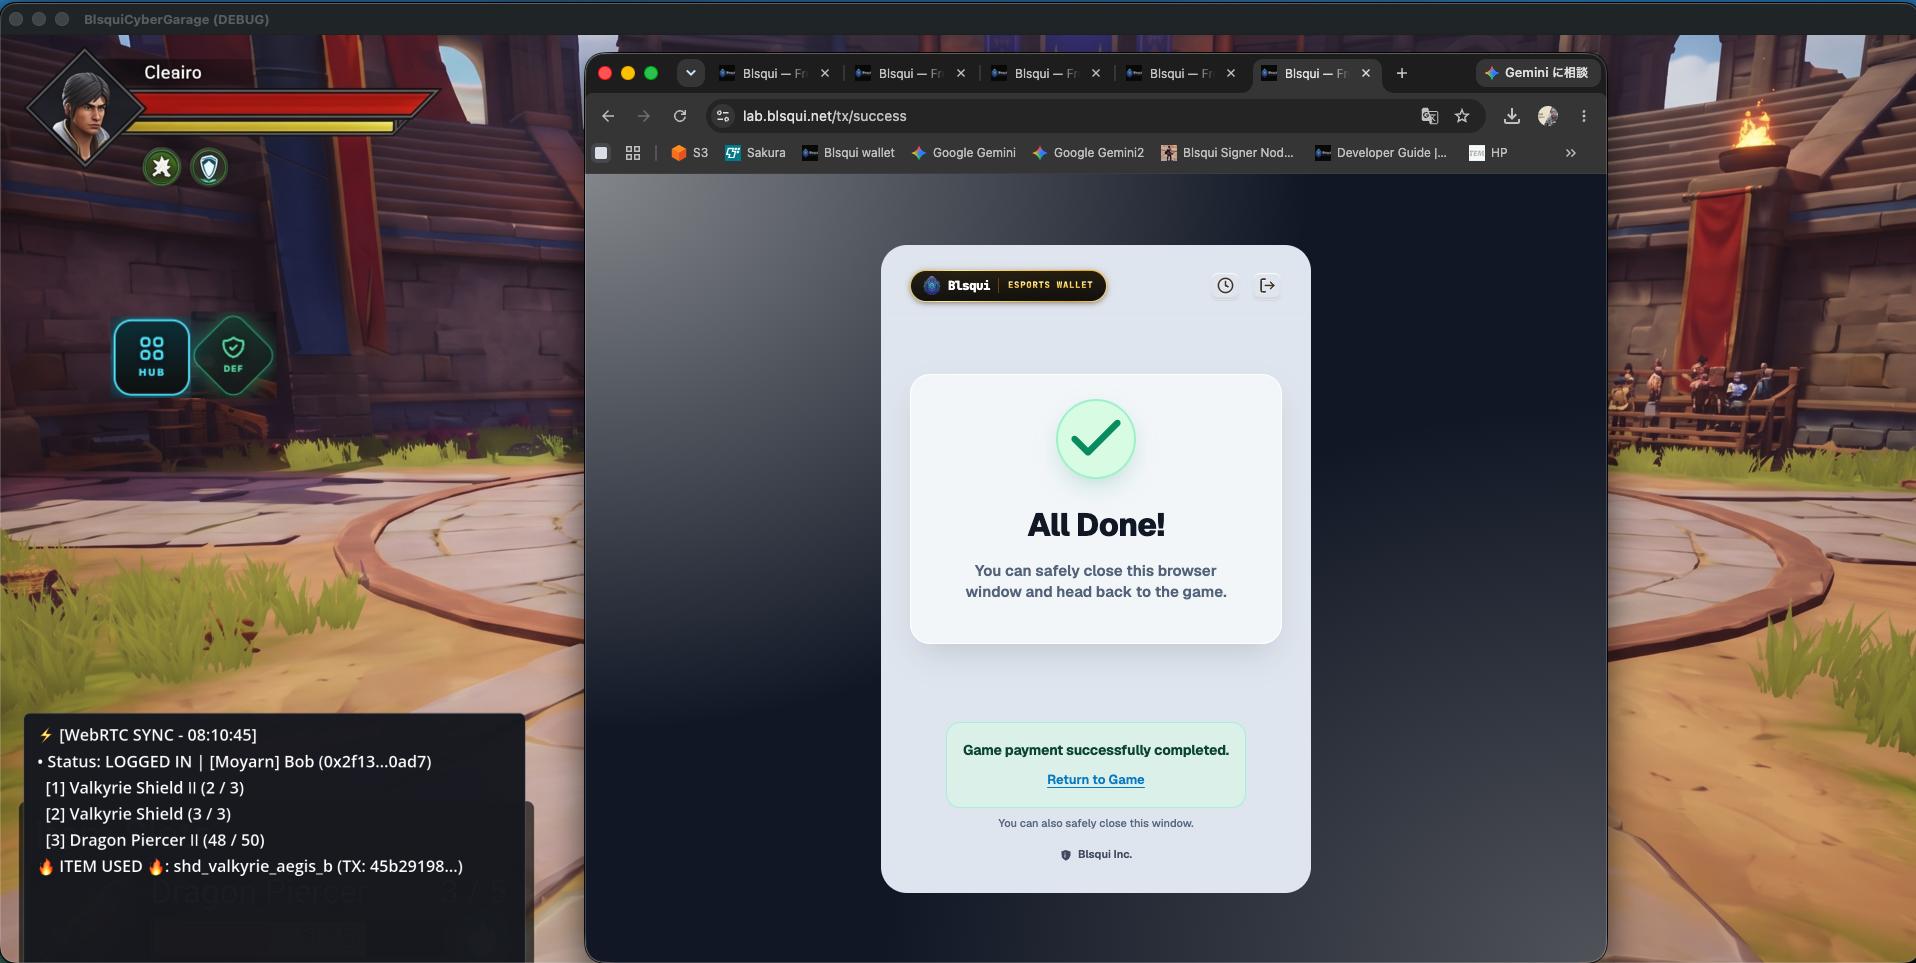
イベントを実行するとSDKのトランザクション画面が開きます。アイテムが購入されるとアイテムを登録したアカウントに代金の全額が振り込まれます。
ブロックチェーンアイテムの使用を促す
BlsquiSDK.trigger_item_actionを呼び出します。
extends CharacterBody2D

const SHIELD_ITEM_ID: String = "shd_valkyrie_aegis_b"

func _ready() -> void:
	input_pickable = true

func _input_event(_viewport: Viewport, event: InputEvent, _shape_idx: int) -> void:
	if event is InputEventMouseButton and event.button_index == MOUSE_BUTTON_LEFT and event.pressed:
		_on_def_button_pressed()

func _on_def_button_pressed() -> void:
	print("[DEF Button] Pressed")

	if not BlsquiSDK.current_user:
		print("[DEF Button] No active session. Open dashboard first.")
		return

	var slots: Array = BlsquiSDK.current_user.user_state.get("slot", [])
	var target_item_id: String = ""

	# Check if the shield is currently equipped in any slot
	for slot: Dictionary in slots:
		var item_id: String = str(slot.get("itemId", ""))
		if item_id == SHIELD_ITEM_ID:
			target_item_id = item_id
			break

	if target_item_id == "":
		print("[DEF Button] Shield not equipped! Cannot trigger DEF action.")
		return

	print("[DEF Button] Activating shield: ", target_item_id)
	BlsquiSDK.trigger_item_action(target_item_id)
_on_def_button_pressed: ボタン押下時に対象の item_id を指定して BlsquiSDK.trigger_item_action を呼び出し、ダッシュボードへアイテム使用を促すメッセージを送信しています。
また、slots_updated シグナルを購読して、装備中のスロットに含まれるアイテムのみボタンを有効化しています。
後半の _on_item_use_requested は、ユーザーがダッシュボード上でアイテム使用を確定した際に自動で実行されるシグナルハンドラです。publisherAddress、appId、itemId、serialNumber を args 辞書に渡して一意のアイテム使用トランザクションを BlsquiSDK.request_transaction に送信し、オンチェーンで確定(SEALED)した後に結果をダイアログ UI へ反映しています。
ダッシュボードが開いている状態でこの処理を実行すると、ブラウザ側のダッシュボード上でアイテムの使用を促すことができます。
Try it out!
- モニターを2つ並べてゲームからダッシュボードを呼び出します。
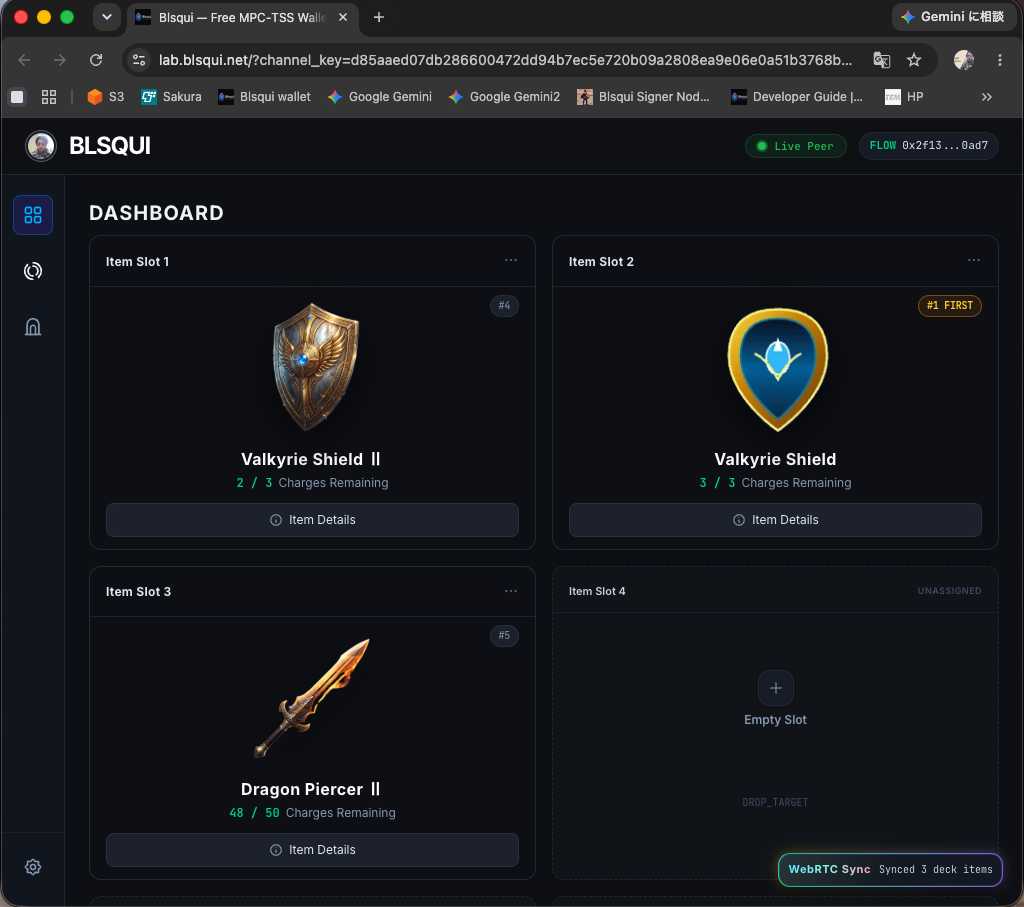
- アイテムを使用して欲しい時にアイテムの使用を促します。
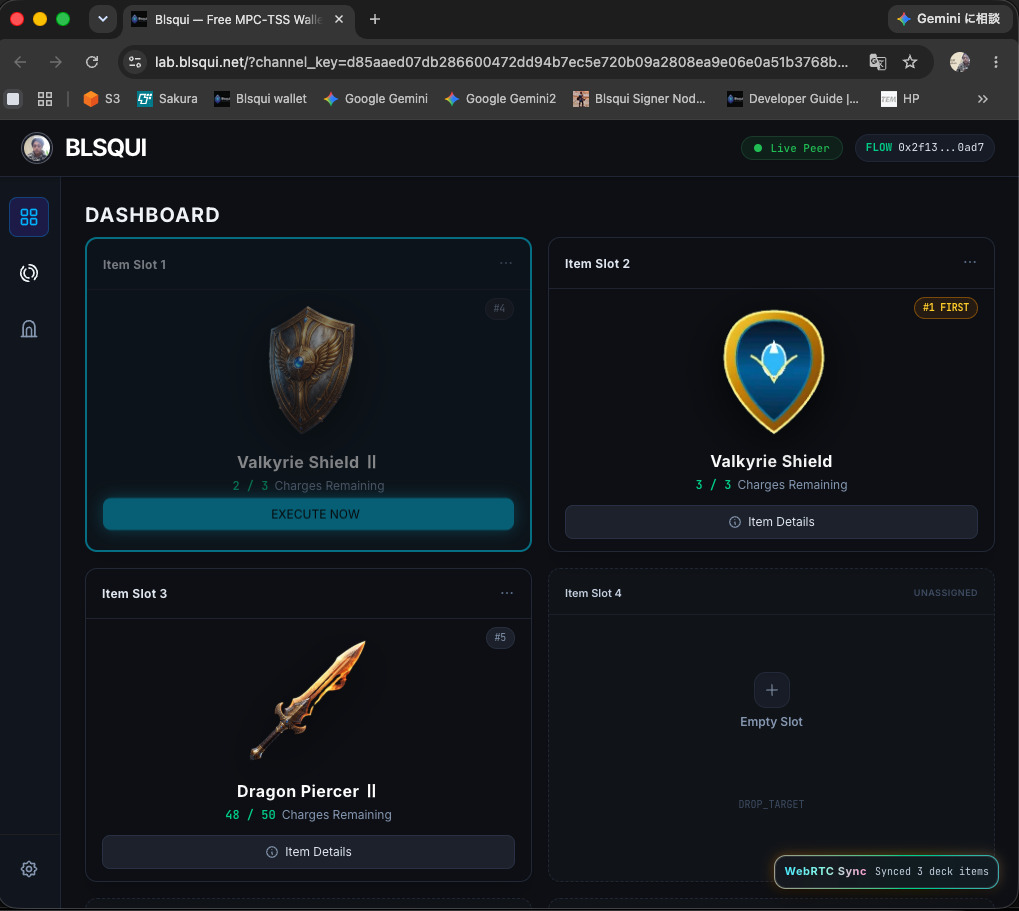
事前にダッシュボードを開いていると、このように指定したアイテムが光ります。一定時間以内にボタンを押すとゲームに通知されます。
- アイテム使用のトランザクションが実行されます。
About the author
- Founder & Architect of Blsqui. Building the cloud-native infrastructure layer that transforms standard video games into instant Web3 eSports platforms. Passionate about democratizing global revenue networks for the next generation of independent, AI-driven creators. Creating plug-and-play, no-code backend frameworks for Unity and Godot that integrate frictionless stablecoin microtransactions without client-side execution overhead.
Comments
Join the discussionNo comments yet. Be the first to comment.